Wednesday, June 15, 2011

Berry Rhubarb Pie

My husband and I went to Costco last week—a big deal since the closest one is an hour away—and we went to town buying fruits and veggies. With an abundance of strawberries and blueberries, we knew we needed to make something with them other than plopping them in our morning smoothies. So we (or I should say my husband) made what he makes best: pie!


Last year we really wanted to make a rhubarb pie, but we procrastinated and missed rhubarb season. Whoops. This year we didn't take any chances and bought rhubarb the second we saw it, and since we had a plethora of berries on hand, we decided to make a Strawberry Blueberry Rhubarb Pie. Or a StrawBluBarb Pie, if you will. As with most berry pies, the fruit will release a lot of liquid, so it's best to let it sit and thicken a bit before digging in...if you can wait that long

I'm pretty sure this is my new favorite pie, especially for the summer. The blueberries popped with sweetness, the strawberries tasted like snozberries...naturally, and the rhubarb complimented the berries sweetness by making my cheeks pucker just a bit. Do yourself a favor and make this pie—or a variation of it with whatever berries you have on hand!


Berry Rhubarb Pie
adapted from All Recipes

Ingredients
  • 3 cups fresh strawberries, hulled and cut (if needed) into bite-sized pieces
  • 2 cups blueberries
  • 2 cups rhubarb, cut into 1/2 inch pieces
  • 3/4 cup white sugar
  • 1/4 cup all-purpose flour
  • 1 tsp cinnamon  
  • 1 teaspoon lemon juice
  • 1 teaspoon melted butter or butter spray
  • 2 tablespoons white sugar
  • two prepared pie crusts

Directions

  1. Preheat oven to 400 degrees F
  2. In a medium bowl, combine berries and rhubarb. In a separate small bowl, mix together 3/4 cup sugar, 1/4 cup flour, and cinnamon. Sprinkle over fruit mixture and stir gently. Let sit for about 15 minutes. Gently stir again, making sure flour and sugar mixture isn't clumpy.
  3. Mix lemon juice into fruit filling, then spoon into pastry-lined pie pan. With the other crust, either make a lattice top (in photo) roll completely out and place over filling. Crimp edges and cut steam vents in top. 
  4. Brush lightly with butter and sprinkle with cinnamon sugar.
  5. Bake for around 40–50 minutes, or until filling is bubbling thick and crust is golden brown.

Friday, June 3, 2011

Sublime Doughnuts {a review}

Sorry for the lack of posts lately! I've been traveling and I think Amanda's been under the weather lately. Traveling combined with trying to sell our house means that I'm spending as little time in the kitchen as possible. Hopefully I'll get back in there soon! 

If you haven't heard, today is National Doughnut Day! I'm kicking myself for not talking about it earlier, especially on the food blog of all places, but a couple weeks ago I went to BlogHer Food in Atlanta and had an absolute blast! I posted this on my personal blog, and realized that I should have posted it here, too. Luckily, seeing as how it's National Doughnut Day and all, today is the perfect excuse to repost it...and get a doughnut today!

Sublime Doughnuts in Atlanta, Georgia

As we were chatting with our new friends from BlogHer Food at dinner our last night, I overheard this from the other end of the table: "They have red velvet, Reese's Peanut Butter Cup, nutella donuts, and so many other flavors I can't even remember. You have to check out Sublime Doughnuts before you leave."


Wait. Hold the phone. There's a specialty doughnut shop minutes from where we were sitting? Half a second after hearing about this magical place, I turned around to tell Natalie about it. I muttered "specialty doughnuts" and before I could even finish my sentence she agreed that we had to go there. 

I should mention that the next morning we were going to take a nice, healthy trip to Whole Foods before dropping me off at the airport. But the doughnuts won. Doughnuts always win. 


The next morning we picked up our fellow food friend, Mandy from Home with Mandy, and headed towards Sublime Doughnuts. We walked in and were almost overwhelmed with choices stacked in the display case. Almost.


Since we couldn't decide on just one doughnut, we decided to each picked four different flavors to try. Then out of nowhere Mandy, bless her heart, bought them for us! While she was picking up the tab we picked up for some forks and started tasting. The three of us made “mmmm” and “yummm” noises with every bite and before we knew it, they were half gone. 


My favorite was the one right smack dab in the middle of the picture: the strawberries in cream. It was the lightest and least sweet out of all the donuts, and now I'm craving another one...I know I'm weird; I like things that aren't too sweet. I don't remember which doughnuts Natalie and Mandy liked (I was too consumed with trying all of them), but maybe they'll tell you in the comments. 

click to enlarge!
So now that I've completely enticed you with donuts, I have two questions for you: 
1. Do you spell it doughnuts or donuts? Personally, I like "donuts," but that's because I'm lazy.
2. What flavor would you try if you had a chance?

Friday, May 13, 2011

Ice Cream Bread


Ice cream bread? Say what?

If you're scratching your head right now, you're not the only one. I saw this a few days ago on Pinterest (anyone else completely addicted to that site?) and knew I had to try making it immediately.

Not only did I try it, but I've kind of gone crazy trying different flavors. I'm still baffled that this bread is made with ice cream! Make this with your leftover ice cream or pick up a pint for a  fun, ridiculously easy, and tasty bread. When I say "ridiculously easy to make" I truly mean that. There are only two ingredients:

Self-rising flour* + Ice cream

The flavors above are strawberry on the left and "turtle tracks" (caramel, chocolate, and peanut butter) on the right. I've also tried pineapple coconut ice cream (SO delicious) and peach ice cream. I just bought some coffee ice cream and plan on making some bread with that very soon. I happen to like chunks in this particular bread, so to the strawberry ice cream I added additional frozen strawberries, and to the peach I added pecans. The sky is really the limit!

If you try this, let us know what you think and what flavor you used; I'm curious how it'll taste with different ice creams.

Ice Cream Bread

Ingredients:
2 cups (1 pint) ice cream
1 1/2 cups self-rising flour*
(For every cup of flour add 1/2 tsp baking powder and 1/2 tsp salt {sift together}. There you go, now you have self-rising flour.)

Directions:
Preheat oven to 350. Spray an 8 x 4 loaf pan or line it with parchment paper. In a medium bowl mix semi-melted ice cream and flour together until just combined. Scoop into the loaf and and smooth out. Bake for about 45 minutes or until a toothpick stuck in the loaf comes out with a few crumbs stuck to it. Remove from the pan and allow to coo. Enjoy! 

Fish "Tacos"


My husband and I have been on the South Beach diet for about 2 weeks now. The first 2 weeks eliminates all grains and fruit, needless to says it's been hard. Also the food has become rather monotonous. Most dinner's consist of a protein and a mound of veggies. Not that it's tasted bad but it's BORING. Which is where these fabulous fish "tacos" come into to play. I certainly can't have tortillas (corn or flour) so I substituted the tortilla with lettuce. I wasn't too optimistic about this but I couldn't stand one more night of grilled fish and a mound of green beans. To my surprise they turned out amazing! I would eat these even if I could eat carbs. SO GOOD! Give these messy (you'll need a few napkins) "tacos" a chance. You'll be a believer.


Fish "Tacos"
Ingredients:
5-8 Fillets white flaky fish (I used Dover)
Cilantro- 1/2 a bunch roughly chopped
Garlic- 2 Tbsp
Onion Powder- enough to season each fillet
Seasoned Salt- To taste
Tequila- 4 Tbsp
Lime juice (2-3 small limes)
Sugar 1 tsp or substitute (I used 1 pkg Truvia)
Olive Oil- Start with a 1/4 cup + more for fish
Diced Tomatoes- 1 15 oz can rinsed and drained
Black Beans- 1 15 oz can rinsed and drained

Directions:
Season each fillet with Olive oil, Onion powder, Seasoned salt, and lime juice. Grill or pan sear each fillet. Set aside. In a small bowl whisk together the juice of two limes, tequila, garlic, 1/2 of chopped cilantro, olive oil and sugar (add more oil and sugar to taste). Set aside. Add 1/4 cup of the vinegarette to a pan over medium heat. Once heated through add rinsed tomatoes and black beans. Once cooked through add another 1/4 cup of vinegarette and flake the fish into the pan. Cook for 5 minutes or until heated through. Spoon the mixture into rinsed romaine leaves and top with reserved cilantro. Enjoy!

Thursday, May 5, 2011

Sopaipilla Cheesecake Bars


I sometimes claim that I'm "not a fan of sweets," but that's a lie. I'm just not a fan of certain sweet treats; there are plenty of desserts I love. Like this one. I'm a sucker for anything covered in cinnamon and sugar, I have a weakness for cheesecake, and I puffy heart love sopaipillas.

Wait. Have you heard of sopaipillas before? (So-pa-pee-ya)
They look like little pillows and are basically puffed dough traditionally served after a Mexican meal. Some people stuff them with leftovers on their plate or fill them with honey for dessert. They're little pieces of heaven and I will one day learn how to make them.

But back to this recipe. It's another one of those desserts that's inexpensive and takes zero time to prepare, but tastes like you worked all morning to make them. I love, love, love the crunchy top and how it's combined with the creamy cheese filling.

I used healthier ingredients to make these (reduced fat crescent rolls, neufchatel cheese, and Brummel and Brown), and I honestly can't imagine how rich it would taste if you used the full-fat versions. Don't get me wrong, this is in no way healthy. But I figure every little bit helps!

A note: these taste good while they're warm and just out of the oven, but they taste even more amazing at room temperature or cold. Patience, my friends! 


Sopaipilla Cheesecake Bars

Ingredients:

2 cans Pillsbury Crescent rolls
2 8oz cream cheese (room temperature)
1 cup sugar
1 1/2 tsp. vanilla extract
2 tsp cinnamon
1/2 cup sugar
2 tablespoons butter, melted
honey (optional)

Directions:

Spray a 9 x 13 pan with cooking spray. Unroll and press 1 can crescent rolls into the bottom of baking dish; press seams together. In a separate bowl, blend cream cheese, 1 cup sugar, and vanilla. Spread cream cheese over top of dough. Unroll second can of crescent rolls and place on top of the cream cheese mixture pressing seams together again. Melt butter in small bowl and brush over top layer of dough. Mix the reaming 1/2 cup of sugar and cinnamon together. Sprinkle cinnamon sugar mixture generously over the top. Bake at 350 degrees for 30 minutes until bubbly and bottom crust is slightly brown. For an added touch of sweetness, drizzle with honey before eating! Tastes good warm, but tastes even better at room temperature or cold.

Tuesday, May 3, 2011

Spanish Rice

My mom has been making this rice for years and I love it so much that I've been known to eat it as a meal in and of itself. Actually, I eat most of it straight from the pot when I think nobody is looking. I'm sneaky like that.

Making this is simple, and I'd be willing to bet that you have everything on hand to make it at the drop of a hat. My mom and I love the onions, but if you're not a fan, leave them out. Same goes for the heat—we clearly like things spicy in our house, so we add a lot more salsa than the average person. If you want things a bit more mild, start with less and add more later.

This is definitely more of a tomatoey rice, but it's what we like and what I grew up eating. The flavors from the salsa really enhance the entire dish, so pick out a good salsa. Serve this with as a side dish to tacos, tostadas, or enchiladas, or incorporate it into a meal of its own by combining some ground beef and stuffing it into a bell pepper!


Spanish Rice
by The Tale of Two Kitchens

Ingredients:
splash of oil
1/2 small onion, diced
1 8oz tomato sauce
8 oz instant brown or white rice (use the tomato sauce can to measure)
1/2 cup salsa
salt, pepper, garlic powder, and red pepper flakes to taste

Directions:
Heat oil in a small pot. Once hot, saute onions until soft and fragrant. Set onions aside in serving bowl.

Add tomato sauce to pot and rinse can out with about half a can's worth of water; add water to pot. Boil sauce; keep an eye on it, because it won't boil like water.

Once sauce boils, add one can of rice, onions, and salsa (you can add more salsa later if you're afraid of adding too much). Cover and simmer for five minutes.

After five minutes, turn off heat, stir, and recover for an additional five minutes. Recheck rice and add additional seasonings (if needed) and continue to leave covered until rice is fully cooked, at a consistency you like, or ready to serve.

(Optional: sprinkle in some shredded cheese after cooking.)

Come join the fun at the My Baking Addiction and GoodLife Eats Holiday Recipe Swap sponsored by Le Creuset.

Sunday, May 1, 2011

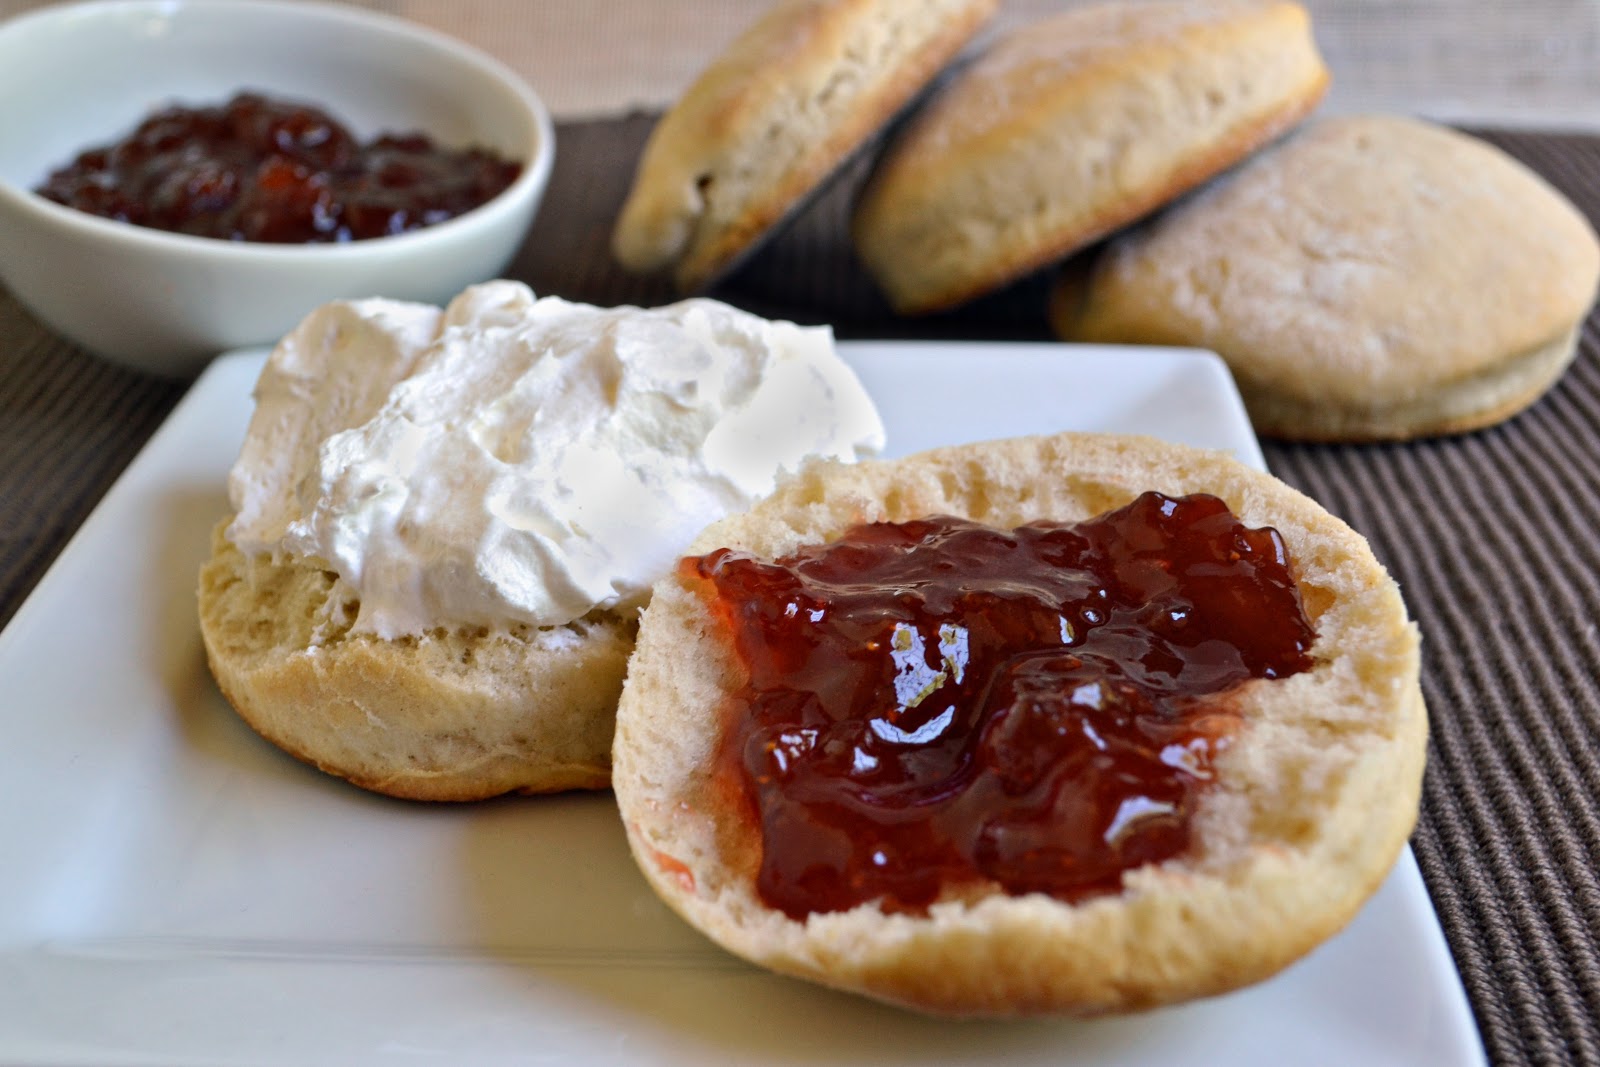
Classic Scones

My first experience with scones dates back to more than a decade ago when I first visited "the other side of the pond." It was right before my senior year of high school and I was in England for one of those see-15-European-countries-in-two-weeks tours. I fell in love with Britain so much that a few years later I decided to partake in a study abroad experience there. But during that first trip, I tried something so delicious that it would stick with me all of these years: a scone.


Scones are a bit sweeter than an American biscuit and are typically eaten with jam and something called "clotted cream"—a slightly heavier and creamier version of whipped or Chantilly cream. I love scones because they're light (not to be confused with healthy!), contain the perfect amount of sweetness, and are just plain good!

I've tried American versions of scones several times, but in my opinion, they all fall short to their British counterpart. First, and I know this is probably a personal preference, but I think scones should be round like a biscuit—not in the shape of a triangle. They should also be light and fluffy, not heavy and brick-like. And while I think adding some lemon or orange zest, or even some currents or cranberries would be great additions, I prefer a simple, classic scone that tastes good. American varieties like to make theirs more like a muffin and over saturate them with too many flavors.


Now that I've giving you my background with scones, you can see why I'm so excited about these. I made these for the Royal Wedding and literally can't stop eating them. I asked a few of my British friends for a classic scone recipe, and my friend Katie sent me this "fool proof" version below. Fool proof is right—I can't believe how easy they are to make, not to mention how delicious the dough tastes (don't judge; I had to do a quality check)! And when you're making these, keep in mind another tip from my Irish friend Lucy, "Use buttermilk which is starting to go off—makes the scones taste amazing!"

Traditionally, you top a scone with jam and clotted cream, but my first attempt at making the mouthwatering topping came up very, very short, so I used whipped cream instead. I will learn how to make some proper clotted cream and will link it back here.


Classic Scones
adapted from Gary Rhodes
makes around 8 scones

Ingredients: 
(BY WEIGHT)
225g (8 ounces) plain flour
15g (1 tsp) baking powder
pinch of salt
25g (1 oz) sugar
50g (2 oz) butter
15 g (1 tsp) vanilla extract
150ml (1/4 pint or 2/3 cup) buttermilk
1 egg, beaten (optional)

Directions:
Preheat the oven to 220°C (425°F). Sift flour, baking powder, and salt into a bowl. Stir in sugar. Cut butter into cubes, and rub it into flour mixture until it resembles fine breadcrumbs. (You can use a pastry cutter, but rubbing it does get the job done a bit faster. Plus it's kinda fun!)

Stir in vanilla and buttermilk, a little at a time, to form a smooth dough. (You may need up to 1/4 cup more flour to get a non-sticky consistency.) Let rest for at least 10 minutes or wrap in cling-wrap and leave in the refrigerator overnight. 

Roll out on a lightly floured surface until 1/2 to 3/4-inch thick (pictured above are around 1/2-inch). Using a 2-inch cookie/biscuit cutter (or the top of a round drinking glass), cut dough. Just tap/push down; twisting tends to create an uneven rise. Once the scones have been cut, work together unused trimmings into a ball, roll out again, and re-cut until all of the mix has been used.

Brush each scone lightly with the beaten egg for a glossy finish or leave as is for a matte finish.

Place scones on greased baking tray and bake for 10 to 14 minutes until golden. Remove and allow to cool slightly.

Serve  scones with tea while still warm (they can be left to completely cool and microwaved quickly to rewarm), preferably with the British classics of strawberry jam and clotted cream.
 
(Other options: 50g (2 oz) of mixed sultanas and currants can be added for fruity scones. Sugar can be omitted for plain savory scones. 50g (2 oz) of grated Parmesan cheese or cheddar cheese can be added, with a good pinch of English mustard, for homemade cheese scones. Freshly chopped thyme can also be added to the savory scones)